Wednesday, February 29, 2012

Basement Project: To-Do!


As you can tell from my previous post here, we still have a lot to do for the basement to turn it into a functional space. I’ve put together a plan for the space using FloorPlanner.com (which, by the way, is an AWESOME tool!) to create an idea of what we’re looking for.


1. This is where we'll keep our seasonal outside tools. Things like winter shovels, garden shovels, rakes, outside broom, etc.
2. I think this is a good location for a small work out area. A few years ago my dad gave me a total gym, and I plan on replacing the broken elliptical. For those who know us, we definitely need to lose weight but the gym thing just isn't for us. I think once we have a dedicated area for these sort of activities, it will help us lose weight. I've included a 32" TV on the wall, which we don't actually own, but it'd be a nice addition.
3. Sump Pump box. As I mentioned before, the hole for our sump pump actually has a few inches of clearance to reach under the foundation of the house. Since we'll be allowing our cats down here, I want this whole area boxed in. The top will have a hinge so we can easily access the pump when we need to. The box will be made out of cheap MDF. Not included in the picture, our dehumidifier will also be here.
4. These are the storage shelves you can see from the first post in the basement project. My plan is to have two shelving systems on either side of the big support beam that runs through the basement (this image isn't to scale in that regard).
5. I was considering putting a water heater closet around our current water heater. The cost to do so, while not extravagant, this is a condo that we don't plan on staying in for more than the next 10 years, so it's not really worth it. Instead, we're discussing placing a more energy efficient or tankless water heater (maybe something like this?). My concern is the cats may get stuck behind our current tank, and we're renting it anyways so it just all around is not ideal.
6. I want to include a tool station/computer desk for Victor. He repairs friends and families computers, and he needs a place to organize parts, towers, and other miscellaneous computer  paraphernalia, and we don't have the space for a dedicated area like this in the office. My dad will be giving us a big metal industrial desk, so it'll be perfect.
7. Since the cats will be allowed down here, I want to put their litter boxes (represented by the shipping boxes) (which are Jumbo Size) here, along with a cat condo. They absolutely love to climb, but cat condos are just plain ugly and get grody quickly since all three are longer haired.

Since we're just starting out, we have a whole laundry list of things that we need to get accomplished.
  • Replace both windows (once has been broken since we moved in)
  • Scrape down the walls, remove as much paint as possible
  • Scrape the floors, remove as much paint as possible
  • Paint the walls with Drylock (I think we're going to go with white or beige)
  • Paint the floors 
  • Paint the beam a noticeable colour (Victor is 6'3", and the beam hangs low enough where he has to bow his head to get under- and often forgets)
  • Paint the stairs
  • Line the insulation so it's not exposed
  • Build sump pump box
  • Install pantry shelving at top of stairs
  • Wrap the beams with sisal rope (we are those types of people, the cats would love this!)
  • Install cat door in the basement door 
  • Replace heaters

The basement view into the french drain. Once we replace the windows, and add a nice white rock to the bottom it should brighten things up considerably! We'll be placing a grate on the top as well to hopefully keep most debris from falling in, besides water.


This is the beam that we'll have to paint. And you can see how the insulation is just kind of hanging there, naked... I'm worried the cats will find a way to get into it. Right now the plan is to simply staple something to each of the dividing beams, maybe those cheap plastic drop clothes? Not really sure yet.


The water heater that will likely be replaced. We pay almost $200 a year for this bad boy! In November, we'll have been here for six years. $1,200! Buying our own will totally pay for itself.


The wall on the right near the door is where I plan to put small shelves to act as a sort of pantry to keep canned goods, extra cleaning supplies, etc.

Victor has to work this weekend. So many projects to do! Which one should I do?

Monday, February 27, 2012

Basement Project: P1

When we moved in, our basement was a leaky mess. It still is, but we’re on our way to recovery. We spent some time this weekend going through everything, cleaning it out. The basement was one of our dumping grounds. I say one because, well, every room is a dumping ground for us. This room though, really takes the cake.

With its prime location right off the dining room/kitchen, its number one use was to quickly hide anything we didn't want people to see when they were coming over. Under normal circumstances, I suppose at some point you actually need to retrieve these unwanted items to do away with. Us? Nah!

As you can imagine, this definitely adds up over time.


This is what we started with. As you come down into the basement, there is literally stuff every where. Strewn about, no rhyme or reason. The shelves are in the center of the room because on the right side of the images is our leaky area. There's a broken elliptical. It's been broken for, maybe what, 4 years? Instead of dragging it down to the dump, we dragged it into the basement. The shredder on the bottom shelf has probably been there longer. Victor was convinced that some day he'd fix it. Sometimes I wonder if we're sane.


The big boxes behind the tables have been there literally since the day we moved in. You know what's in there? Nothing. They are empty. The old owner had left them there.


This is leaky corner number one. Definitely the worst in the basement. Water seeps through the walls. We've been lucky to only have flooding occasionally (mostly limited to this corner, and only 2-3" deep), but it leaves something to be desired. In our basement project, we plan to scrape off all the paint that is, as you can see, peeling away anyways. We'll be Dryloking the entire basement.


Leaky corner number two, and the wall next to it. This wall runs all along the outer wall where we have french drains installed. We've inquired to the condo association multiple times about getting them re-done, but our issues with them are vast and numerous and I don't have time to address them here. We spent a little time as we were cleaning everything out scraping down these walls.


Under the stairs (same wall as the leaky corners and french drain). You can see the the paint that was on the floor is mostly coming up. Aside it being dirty, it's not horrible like the rest of the wall.

All is not lost though! We spent a total of around five hours working to clean everything out and organize everything. 


This is now what you see when you walk into the basement. Sorry for the difference in images, A. I am using my Android's camera, B. It was morning when I took the before, late afternoon when I took the afters,  and C. I have zero photography skills what-so-ever. Anyways, this is our sump pump area. The plan is after we get the basement water proofed, this will be a hinged box as the actual hole itself goes under the foundation and the last thing I need is to have a cat get stuck under the house!


Same area just a different view. All the stuff bunched together on the left is what we're getting rid of in the immediate future. The elliptical/glass/pallets will also be going, but when my dad comes to visit with his pick-up truck to make things easier.


A close up of all that will be leaving. Note that this picture does not include the four contractor sized trash bags filled to the brim we've already taken to the dumpster.


Looking toward the back of the basement, you can see that we moved all the shelves along the far wall that does not have any water damage (it's also the wall we share with our neighbors, we're the end unit townhouse). We swept and shop-vac'ed the entire thing, and started scraping down the walls just a little.


Here's a better look at our shelves. I did do a bit more cleaning of them, but forgot to take new pictures so this will have to do. Also, no more cardboard boxes! Who keeps cardboard boxes in a damp basement? Although nothing was actually ruined (!) it's not a good idea. I got the plastic bins from Wal-Mart with a gift card from my Papa, so they were essentially free. My only complaint is they are just a little too wide, and I can't fit two on a shelf with the supports in the way.


This is the left shelf in more detail. Those paper cups and stuff actually came upstairs, and I changed a few other things but again, no new picture... oops. The top most bin holds books and toys, the second has some retro video games (SEGA CD, Super Nintendo, NeoGeo, and some of the original GameBoy games), the third has retro game systems that go with the bin above (SEGA CD, original PlayStation, Super Nintendo, N64, and some other SEGA one that I can't remember the name of). On the bottom shelf are Nintendo Power magazines from 1990-2000 I believe, and the red crate holds all of Victor's car cleaning essentials.


Our ceilings are too low in the basement to fit the shelving units at full height, so this is a sort of faux shelf that we made with the left overs. Right now it's housing our Christmas and Halloween decorations, and some extra tile.


The final shelf is holding our tools/painting supplies. Nothing really to be said about that.

As I said before, we did scrape the walls to get a little head start on the actual, nitty-gritty scrape that we'll be doing hopefully next week. It has already made a big difference in how the basement looks.


Leaky corner one all scraped out and vacuumed.


Leaky corner two and wall. Looks so much better!


 It's amazing what a little bit of elbow grease and organization will get you. From this...


To this! (Let's pretend that pile in the front of the camera isn't actually there. When it's finally gone I'll retake this angle.)

We still have a lot of work to do, but this is a great start! It feels good to get some work done.

Friday, February 24, 2012

Home Made Laundry Detergent


So lately I’ve been reading a lot of articles regarding the home made laundry detergent powder that a lot of bloggers have been using, I decided I would give it a go. Not because I’m green, or trendy, or anything like that. Simply because I’m broke, and each batch is supposed to yield 40 or so loads. I bought everything at my local Market Basket for a total of $9.68.

One cup of Washing Soda
One cup of Borax
One bar of Ivory Soap (you can use Fels Naptha too)

Sure, $9.68 might seem like a lot for detergent, but I'll be able to get at least three batches out of it (my Ivory soap came in a pack of three)!  So if I'm able to get 120 loads, that comes out to about $.08 a load, or $3.22 per "bottle" of detergent. I used 1tbsp in a load of laundry the other night, and it definitely came out clean. No fake powdery laundry scent, just a plain clean cloth scent. I did read that if you're so inclined, you can add some sort of essential oil to the mix to get that scent, and some of them are anti-bacterial so its a win win!

Right now I've got my mix sitting in an unattractive plastic container, but there are lots of creative ways to store this stuff. I got most of my information from the Yellow Brick Home, so be sure to check out all the useful things they had to say.

Thursday, February 23, 2012

New Knobs!

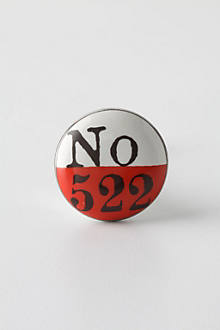
The knobs I’ve had my eyes on at Anthropology went on sale a few days ago. I was able to pick up the knobs I wanted for our entertainment stand, for $2.95 each! They were $8.00 each.


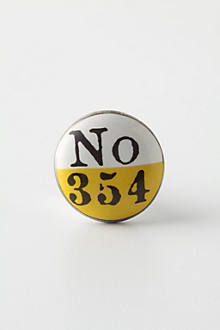
I even picked up a yellow version for the cabinet I want to put in our bathroom, after we gut the whole thing.


There is still a lot we have to do to the living room, hopefully I’ll have more to update soon! You can find these knobs at Anthropolgy, on sale. Total cost of the three knobs? $8.85. All three for the original price of one knob! Score!

What do you think? I can't wait to see them in!